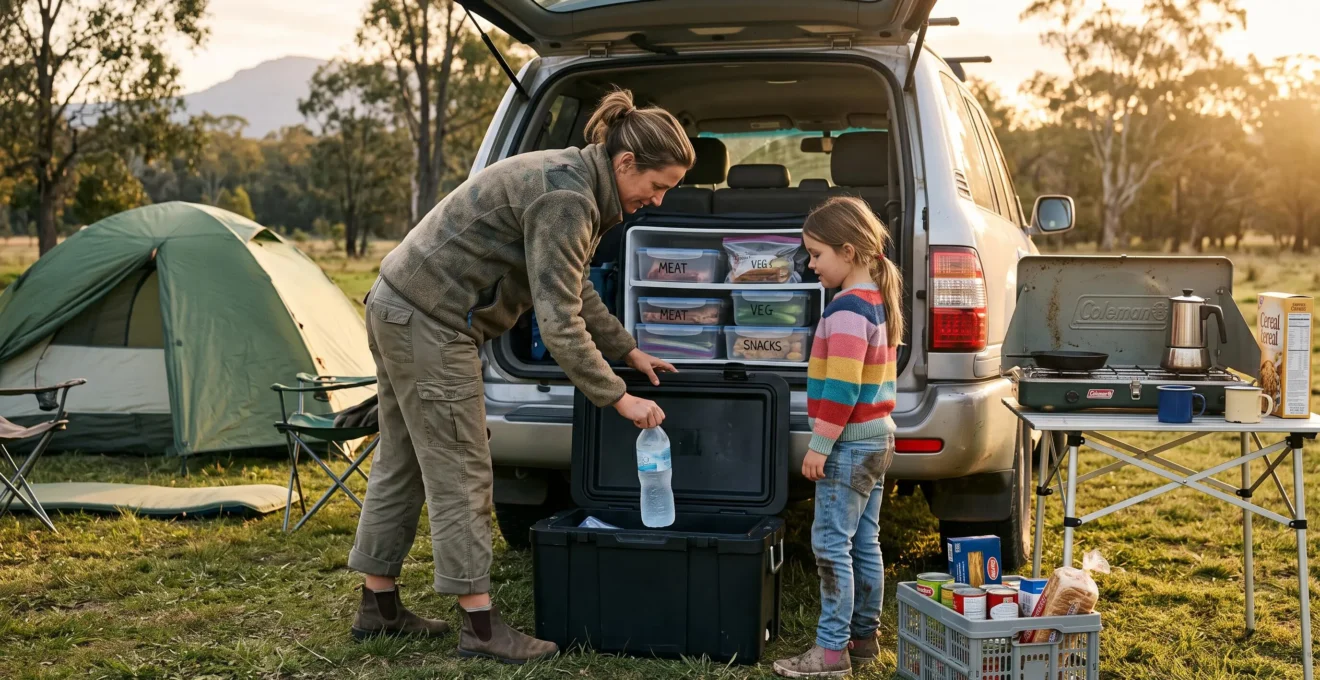
Keeping food safe during a three-to-five-day camping trip requires more than loading a cool box with ice packs. A vehicle may spend hours in direct sunlight, food containers are repeatedly handled, and remote campsites may offer neither refrigeration nor convenient shops. The central challenge is maintaining safe temperatures while preventing contamination and ensuring that every meal remains practical to prepare.
The most dependable approach combines three measures: protect the cold chain, separate raw food from ready-to-eat meals, and plan a gradual transition to shelf-stable ingredients. A passive cool box can support the early stages of a journey, but its contents must be assessed by actual temperature rather than the number of days since departure. A 12V refrigerator offers greater temperature control only when its electrical supply is dependable.
For families touring rural UK campsites, packing order matters almost as much as equipment choice. Accessible breakfast supplies, dedicated cooking containers and a plan for drying wet camping equipment all reduce unnecessary unpacking, exposure and handling.
Essential rules for safe multi-day camping food
- Pre-chill perishable food, use sufficient frozen cooling packs and verify that chilled items remain at 5°C or below, preferably closer to 4°C.
- Keep raw meat in dedicated sealed containers below ready-to-eat food, and avoid repeatedly opening the food cool box for drinks.
- Plan shelf-stable meals for later travel days, with enough drinking and preparation water to remain independent of campsite facilities.
- How to Pack a Cool Box to Keep Food Fresh for Three Days Without Ice Refills?
- The Packing Error That Causes Cross-Contamination in Camping Cool Boxes?
- Passive Cool Box or 12V Fridge: Which for Five-Day Trips Without Power?
- How to Build a Three-Day Menu Using Only Ambient-Stable Ingredients?
- When Should You Stop Using Fresh Produce and Switch to Tinned Alternatives?
- How to Pack So Breakfast Equipment Is Always Reachable in 30 Seconds?
- How to Dry Tents and Sleeping Bags Thoroughly Enough to Prevent Mould Growth?
- How to Pack Cooking Gear Efficiently for Accessible Meal Preparation at Campsites?
How to Pack a Cool Box to Keep Food Fresh for Three Days Without Ice Refills?
To keep a cool box effective for three days without replenishing ice, chill the box and its contents before departure, arrange frozen cooling sources around sealed food containers, minimise empty space and limit lid openings. However, three days is a planning target, not a safety guarantee. Only temperature checks can establish whether perishable foods remain safely chilled.
Start the previous evening. Refrigerate ingredients that require chilling and freeze suitable cooling packs or water bottles completely. Pre-cool the empty box using temporary cold sources before loading it, then replace those sources with fully frozen packs immediately before departure.
A practical layered arrangement places large frozen bottles or solid cooling blocks along the bottom and sides, with leakproof food containers positioned between cooling sources. Additional frozen packs above the food improve exposure to cold air. Bottles can be convenient because their meltwater remains contained, whereas loose ice may leave packaging standing in water. Neither arrangement removes the need for watertight containers.
The USDA‘s food safety guidance for hiking and camping recommends pre-chilled food, frozen cooling sources, suitable insulation and protection against contact with melting ice water. It also notes that larger blocks of ice generally last longer than individual cubes.
Cooling duration depends on heat exposure, insulation, the amount of frozen material, initial food temperature and how often the lid is opened. Filling unused space with additional frozen bottles can increase cold reserves. Simply adding an insulating object, however, does not provide extra cooling energy.
Before departure, group meals by retrieval order. Items required on the first day should be accessible without removing several lower layers. Move drinks and snacks into a separate container if they will be accessed frequently.
Five checks before leaving with a loaded cool box
- Pre-chill refrigerated ingredients and record their loading temperature with a food thermometer.
- Freeze sufficient cooling bottles or packs and confirm they are solid before packing.
- Place raw food inside dedicated leakproof containers and check every lid and seal.
- Prepare a meal retrieval order and place frequently requested drinks outside the main food box.
- Install a suitable thermometer and record an initial cold-box reading before departure.
A partly frozen bottle on day two indicates that some cooling capacity remains, but it does not prove that every food container stayed at a safe temperature. Use a thermometer placed among the chilled items and check food temperatures where necessary. For a UK camping plan, aim to keep food requiring refrigeration at 5°C or below.
If the box cannot maintain safe temperatures, move to a planned shelf-stable meal rather than relying on how cold a container feels. Temperature control also becomes less reliable when raw and ready-to-eat foods are packed without separation.
The Packing Error That Causes Cross-Contamination in Camping Cool Boxes?
The most dangerous cool-box packing error is allowing raw meat juices to escape into shared storage space or meltwater, where they can contact ready-to-eat food and containers. Prevent this by using leakproof containers, keeping raw animal products below prepared foods and cleaning hands and contact surfaces. Cold temperatures slow microbial growth but do not prevent cross-contamination.
In an overloaded camping box, raw chicken may be wrapped in supermarket packaging beside sandwich fillings, fruit and cooked meals. If the wrapping leaks or contaminated meltwater touches another container, bacteria can transfer to items that will not be cooked before eating.
Double-bagging reduces the chance of leakage but is less dependable than a properly sealed, dedicated container. A damaged outer bag, condensation on dirty surfaces or hands that have handled raw packaging can still create opportunities for contamination.
A practical three-zone layout makes separation easier:
- Bottom zone: raw meat and poultry in rigid, leakproof containers, ideally inside a separate food box.
- Middle zone: sealed cooked meals, dairy products and ready-to-eat ingredients protected from raw-food contact.
- Top zone: frequently retrieved items, preferably with drinks stored separately to reduce openings.
This zoning method is an organisational safeguard rather than a formally validated three-zone safety standard. It must not compromise cooling distribution: all temperature-sensitive food still needs sufficient contact with cooling sources and safe storage temperatures.
Handling routines are equally important. Wash hands with safe water and soap after touching raw meat packaging, use separate utensils for raw and ready-to-eat ingredients, and clean handles or contact surfaces if they become contaminated. A reusable wiping cloth must itself be kept clean; otherwise it can spread contamination.
Vehicle storage adds another complication. A box left in a sun-warmed cabin or repeatedly carried between warm and cool locations has a greater heat load. This can shorten the time its cooling sources remain effective, while bacterial contamination remains a separate concern.
When a separate raw-meat box is impractical, choose meals that require less raw-meat handling, including pre-portioned ingredients that can be cooked promptly. Avoid placing cooked leftovers into containers previously used for raw food unless they have been thoroughly cleaned.
Once separation and temperature monitoring are established, the next decision is whether passive insulation can reliably meet the journey’s refrigeration needs or whether powered cooling is justified.
Passive Cool Box or 12V Fridge: Which for Five-Day Trips Without Power?
For a five-day trip without mains electricity, choose a passive cool box when meals can progressively shift towards shelf-stable ingredients and frozen packs are sufficient for the early stages. Choose a 12V compressor fridge when reliable chilling is essential and a properly sized independent power supply is available. A refrigerator without dependable electricity is not a complete food-preservation solution.
A passive box consumes no electrical power but cannot actively replace the cold lost during warm weather or frequent opening. A compressor fridge can regulate temperature while power remains available, but it introduces electrical demands, equipment cost and the possibility of failure.
The comparison should therefore start with the journey’s menu and power arrangements rather than appliance specifications alone.
| Decision criterion | Passive cool box | 12V compressor fridge |
|---|---|---|
| Five days without resupply | Depends on frozen reserves, weather and the proportion of shelf-stable meals | Can support longer chilled storage if sufficient electricity remains available |
| Battery dependency | No electrical demand | Requires ongoing electrical power and appropriate protection |
| Vehicle storage | Space needed for frozen packs as well as food | Space needed for the unit, ventilation and potentially a separate battery |
| Failure consequences | Gradual warming requires food assessment and possible disposal | Power loss may warm food and, if connected improperly, affect vehicle starting |
Running a refrigerator from the vehicle’s starter battery while parked presents a particular risk. Actual operating time depends on battery capacity and condition, refrigerator consumption, the compressor’s duty cycle and ambient temperature. No universal one-day or two-day battery-life estimate is dependable.
Some models incorporate low-voltage protection. For example, Dometic CFX3 battery protection documentation describes a system that monitors incoming DC voltage and automatically stops cooling when voltage falls below a threshold. It offers several protection settings, but such protection does not guarantee that a vehicle can restart or that food remains cold after the fridge stops.
A separate leisure battery, suitable charging arrangement or appropriately designed solar system can reduce reliance on the starter battery. The system must be sized for the actual appliance and expected conditions; solar generation cannot be assumed during cloudy UK camping days.
A hybrid approach is often practical. Use a passive box containing frozen reserves and the earliest chilled meals, while a reliably powered refrigerator maintains temperature-sensitive items. If no reliable electrical supply exists, arrange replenishment of frozen packs or switch to entirely shelf-stable meals before cold storage becomes unsafe.
A menu built around ambient-stable ingredients may remove the need for powered refrigeration altogether. That makes food selection the logical next stage of planning.
How to Build a Three-Day Menu Using Only Ambient-Stable Ingredients?
Build a three-day ambient-stable camping menu around unopened foods that are specifically suitable for storage without refrigeration: oats, dried fruit, nut butter, wraps, rice, couscous, pasta, tinned vegetables and shelf-stable proteins. Pair each meal with its water and cooking requirements, then arrange chilled foods earlier in the trip and ambient-stable meals later.
The important distinction is between an ingredient that is genuinely shelf-stable and one that merely appears durable. An unopened carton of long-life milk may be suitable for ambient storage, but after opening it generally requires refrigeration according to its label. Similarly, fresh cheese, chilled deli meat and prepared salads should not be treated as shelf-stable simply because they are packaged.
The following framework gives families flexibility without requiring the same meals every day.
| Meal | Suitable unopened ingredients | Preparation principle |
|---|---|---|
| Breakfast | Oats, dried fruit, powdered milk, nut butter | Add safe water when preparing and use opened ingredients promptly |
| Lunch | Wraps, peanut butter, unopened tinned fish, whole fruit | Open individual portions immediately before eating |
| Dinner | Couscous, pasta, tinned beans, tinned vegetables, dehydrated meals | Cook with safe water and avoid retaining leftovers without refrigeration |
Hard cheeses and cured meats require more individual assessment than broad food categories suggest. Some products can be stored unopened at ambient temperature; others explicitly require refrigeration. Follow the actual packaging instructions rather than relying on whether a food is described as hard, cured or preserved.
A three-day progression might use dry oats and a freshly opened milk portion for breakfast, wraps and individually opened tins at lunch, and cooked pasta with tinned vegetables for dinner. On the following days, the ingredients can vary without changing the storage system.
However, dried menus create a hidden dependency on water. Couscous, pasta, dehydrated meals and powdered milk all need suitable water, while pots, utensils and hands still need cleaning. Plan those demands alongside drinking reserves, particularly where campsite taps or potable water cannot be assumed.
Opening a shelf-stable product changes its storage requirements. Opened tins, reconstituted milk and cooked leftovers generally need appropriate refrigeration if they will not be eaten promptly. Avoid preparing oversized portions when there is no dependable way to store the remainder.
This framework makes the transition from fresh food to preserved ingredients a deliberate part of the itinerary rather than an improvised response to a warming cool box.
When Should You Stop Using Fresh Produce and Switch to Tinned Alternatives?
Switch from fresh chilled ingredients to shelf-stable alternatives whenever refrigeration temperatures can no longer be maintained or reliable temperature history is unavailable. The decision should depend on the type of food, its packaging and its exposure to warmth, not simply whether it is day two or day three. Smell and appearance cannot establish that unsafe food is safe.
Not all fresh produce needs refrigeration throughout a short camping trip. Whole apples, oranges, onions and other suitable intact produce can often be transported under appropriate ambient conditions. Soft berries, prepared fruit, cut vegetables and chilled salad products are more vulnerable and may require refrigeration according to their condition and packaging.
For a family travelling between remote UK campsites, arrange ingredients by storage sensitivity rather than date alone:
- Early meals: raw meat, chilled prepared dishes, cut fruit and other highly perishable ingredients, provided they have remained safely refrigerated.
- Flexible fresh meals: suitable intact fruit and vegetables stored cleanly, dry and protected from excessive heat.
- Reserve meals: unopened tinned vegetables, beans, fish and other clearly labelled shelf-stable products.
The USDA identifies 40°F–140°F, approximately 4°C–60°C, as a temperature danger zone and advises that perishable food should not remain in that range for more than two hours, or one hour when ambient temperatures reach 90°F (approximately 32°C). These are maximum exposure limits rather than targets for normal food storage.
2 hours
The USDA’s general maximum exposure time for perishable food in the temperature danger zone, reduced to one hour in very hot conditions. For a UK camping trip, keep chilled food at 5°C or below and minimise time outside refrigeration.
USDA Food Safety and Inspection Service camping guidance.
A cool box thermometer is useful for detecting warming, while direct food temperature measurements may be necessary when the surrounding temperature is uncertain. If ice and frozen packs have completely melted and the food has not been reliably kept cold, discard remaining perishables rather than relying on taste, appearance or smell.
The same caution applies to cooked rice and pasta. Some foodborne hazards may be present without an obvious smell or visible spoilage. A meal that has spent an unknown period warm inside a container should not be rescued by reheating.
Check tins before use. Reject containers that are swollen, leaking or otherwise show signs of compromised integrity. Once opened, tinned foods are no longer protected by the original shelf-stable packaging; consume suitable portions promptly and refrigerate leftovers where required.
Once the menu includes a dependable shelf-stable reserve, the remaining challenge becomes operational: organising daily access so that retrieving breakfast does not disturb the cold chain.
How to Pack So Breakfast Equipment Is Always Reachable in 30 Seconds?
To make breakfast equipment accessible in roughly 30 seconds, store the complete morning kit in a dedicated container beside the vehicle’s main access point, and load it last. Group the stove accessories, kettle, breakfast bowls, drinks and shelf-stable food together. The time target is an organisational goal, not a guaranteed retrieval standard.
Many camping vehicles are packed according to the shape of equipment rather than its order of use. As a result, the kettle may sit beneath sleeping bags, mugs may be stored with dinner cookware, and porridge ingredients may end up behind the cool box.
Reverse that logic by arranging storage around the daily schedule. Breakfast comes first each morning, so breakfast supplies should be among the last items loaded and the first items accessible after opening the vehicle.
A dedicated grab-bag or rigid breakfast crate can include:
- Kettle or compatible stove accessories, with the stove used only in a safely ventilated outdoor location.
- Tea, coffee, oats, powdered milk and sealed portions of breakfast ingredients.
- Cups, bowls, spoons and a small cleaning cloth.
- A readily accessible safe-water container.
- A lightweight washable preparation surface.
Keep fuel in its own appropriately secured storage position, separated from food and protected according to the manufacturer’s instructions. A stove or gas cylinder should never be operated inside a vehicle or enclosed tent.
Sort the remaining equipment into daily-use and occasional-use categories. Cooking supplies, water containers and washing-up equipment remain near the access point. Spare clothing, reserve dry food and items required only at the final destination can occupy deeper storage positions.
Most importantly, keep ambient breakfast ingredients outside the chilled food box. If every morning starts with searching through refrigerated supplies, repeated lid openings add heat and compromise the box’s cooling reserves.
A brief trial pack before departure can reveal whether the breakfast crate is genuinely reachable without shifting heavy luggage. This is more useful than assuming a storage design will work simply because everything fits.
An accessible breakfast kit also creates an opportunity to deal with damp camping equipment while preparing the morning meal, provided drying is done safely and without contaminating food-preparation areas.
How to Dry Tents and Sleeping Bags Thoroughly Enough to Prevent Mould Growth?
Prevent mould by thoroughly drying tents and sleeping bags before storing them in enclosed bags, paying particular attention to seams, groundsheet folds and insulated fabric. During consecutive travel days, air damp equipment whenever weather allows and avoid leaving it compressed in a warm vehicle. If complete drying is impossible on the road, arrange a thorough drying session as soon as practical.
Moisture accumulates in several places during camping. Condensation wets the inner flysheet, dew collects on external fabric, and ground contact leaves the underside of a tent damp even when the sleeping area appears dry.
Closing these materials inside tightly packed bags traps moisture. During a driving day, limited ventilation and warm vehicle conditions can prolong dampness and increase the risk of mould or material deterioration.
A practical travel-morning routine begins by removing loose water and shaking out the flysheet. Hang it over a clean, secure, stationary structure where it cannot touch food, hot equipment, electrical connections or moving vehicle components. A suitable roof rack can sometimes provide a temporary drying position, but it must not obstruct vehicle access or be used to carry unsecured drying fabric while driving.
Inspect the groundsheet underside and seams separately. These areas may remain damp after exposed surfaces feel dry. Unzip sleeping bags and spread them in a ventilated area, away from direct contact with wet ground. Damp insulation often needs a longer drying period than lightweight tent fabric.
Check fabric surfaces by touch, especially at folded seams and underneath insulating layers. Musty odours or visible dark spots can indicate a problem, but their absence does not prove that equipment is dry. Do not wait for visible mould to develop before acting.
The principles are consistent with REI camping gear cleaning and storage advice, which warns against storing damp tents and recommends thoroughly drying sleeping bags before long-term storage. It also advises against prolonged compression of down and synthetic insulation.
During a wet journey, a breathable temporary arrangement can be useful where safe and practical, but it is not a substitute for complete drying. Once home, pitch or hang damp equipment in a suitable dry, ventilated space until fully dry, then store sleeping bags loosely in breathable storage bags.
Managing damp equipment alongside breakfast works best when kitchen supplies are equally organised, allowing food preparation, cleaning and packing to proceed without repeatedly unloading the vehicle.
Key takeaways before organising the camp kitchen
- Storage should follow the order of use: everyday cooking equipment needs immediate access, while reserve supplies can stay deeper in the vehicle.
- Meal portions prepared before departure reduce unnecessary container handling and make safe storage easier to maintain.
- Cooking, washing and waste disposal must fit the campsite’s actual facilities, especially where potable water and designated wastewater points are limited.
How to Pack Cooking Gear Efficiently for Accessible Meal Preparation at Campsites?
Pack camping cooking equipment by the sequence of preparing a meal rather than by equipment category. Keep the stove, cooking vessel, utensils, preparation tools and cleaning supplies in a small number of accessible containers. Pre-portion dry ingredients where practical, transport fuel separately and establish the campsite’s water and waste arrangements before cooking.
A conventional camping setup often separates pots, cutlery, utensils, seasonings and washing materials into different luggage areas. This may save individual container space, but it creates repeated searches and handling whenever a meal is prepared.
A better approach uses a dedicated cooking crate containing everything required between setting up the cooking area and serving food. The crate might hold one suitable pot, a pan if necessary, a cutting board, utensils, a knife with a protective cover and reusable eating equipment.
The stove can be stored alongside the cooking kit when cool, clean and disconnected from its fuel supply. Fuel cylinders should be secured separately, kept away from heat and food, and transported in accordance with their safety instructions. Never cook inside the vehicle or in an enclosed camping shelter.
Meal preparation becomes simpler when dry ingredients are portioned into suitable labelled containers before departure. Separate packets of couscous, spices or dried vegetables can reduce the need to open several large packages at each stop. Label portions clearly and retain any essential storage, allergy or cooking information.
For foods requiring refrigeration, portioning must not interrupt the cold chain. Prepare chilled ingredients hygienically, return them promptly to safe storage and avoid unnecessarily opening the cool box while sorting cooking equipment.
Cleaning arrangements deserve the same attention as cooking. Keep safe water, washing-up equipment and a designated waste container accessible. Remove food scraps from utensils before washing, and dispose of them appropriately rather than leaving residues near the food-storage area.
Wastewater rules vary by destination. Developed UK campsites may have designated washing-up sinks or grey-water disposal points. Where these are available, use them rather than pouring dishwater onto the ground. Biodegradable soap does not make uncontrolled wastewater disposal environmentally harmless.
Backcountry practices can be more restrictive or site-specific. For example, the Point Reyes National Seashore guidance included in the reference material describes separating washing activities from sensitive areas, straining food scraps and carrying them out. These instructions illustrate the importance of checking destination-specific rules, not a universal standard applicable to UK campsites.
Finally, place the cooking crate beside the breakfast kit and water supply, leaving a clear route to the vehicle’s access point. Reserve dry provisions can occupy a secondary storage area, while the current day’s food stays within easy reach without compromising temperature control.
Before the next journey, test the complete routine at home: retrieve breakfast equipment, prepare a simple meal, clean the utensils and return everything to storage. Adjust the packing layout wherever the sequence requires unnecessary unloading, while keeping temperature checks and food separation non-negotiable.
Can frozen water bottles keep a cool box safe for three days?
Frozen water bottles can provide useful cooling, but they cannot guarantee a safe three-day storage period. Performance depends on the box, ambient temperature, initial food temperature, the quantity of frozen material and opening frequency. Use a thermometer to confirm chilled food remains at a safe temperature, and discard perishables when safe storage cannot be verified.
Is it safe to leave a 12V camping refrigerator running overnight in a parked car?
It depends on the refrigerator’s electrical demand, the battery system and any low-voltage protection. Operating from a starter battery can compromise the ability to restart the vehicle. A properly sized independent power supply is generally more suitable for extended stationary use. Confirm that adequate electricity will remain available throughout the night.
Can cooked camping meals be stored overnight without refrigeration?
Perishable cooked meals should not be kept overnight at ambient temperature. Food that requires chilling must be cooled and refrigerated safely, or consumed without retaining leftovers. Cooking extra rice, pasta or meat does not make it suitable for unrefrigerated storage. When reliable refrigeration is unavailable, prepare portions intended for immediate consumption.
How should camping food be arranged if the car has limited storage space?
Prioritise separation between raw and ready-to-eat foods, secure temperature-sensitive ingredients in adequate cooling equipment and keep dry provisions in a clean, accessible crate. Store drinking water and daily cooking supplies where they can be retrieved without shifting the cool box. Never sacrifice leakproof containment or temperature control merely to fit more ingredients into a small vehicle.
What should campers do if their cool box becomes warm halfway through a trip?
Check the temperature and assess whether chilled food has remained within safe storage conditions. If cooling has failed and the temperature history is uncertain, discard potentially unsafe perishables rather than relying on smell or taste. Switch to unopened shelf-stable meals, use safe water for preparation and arrange fresh refrigeration or supplies before buying more chilled food.