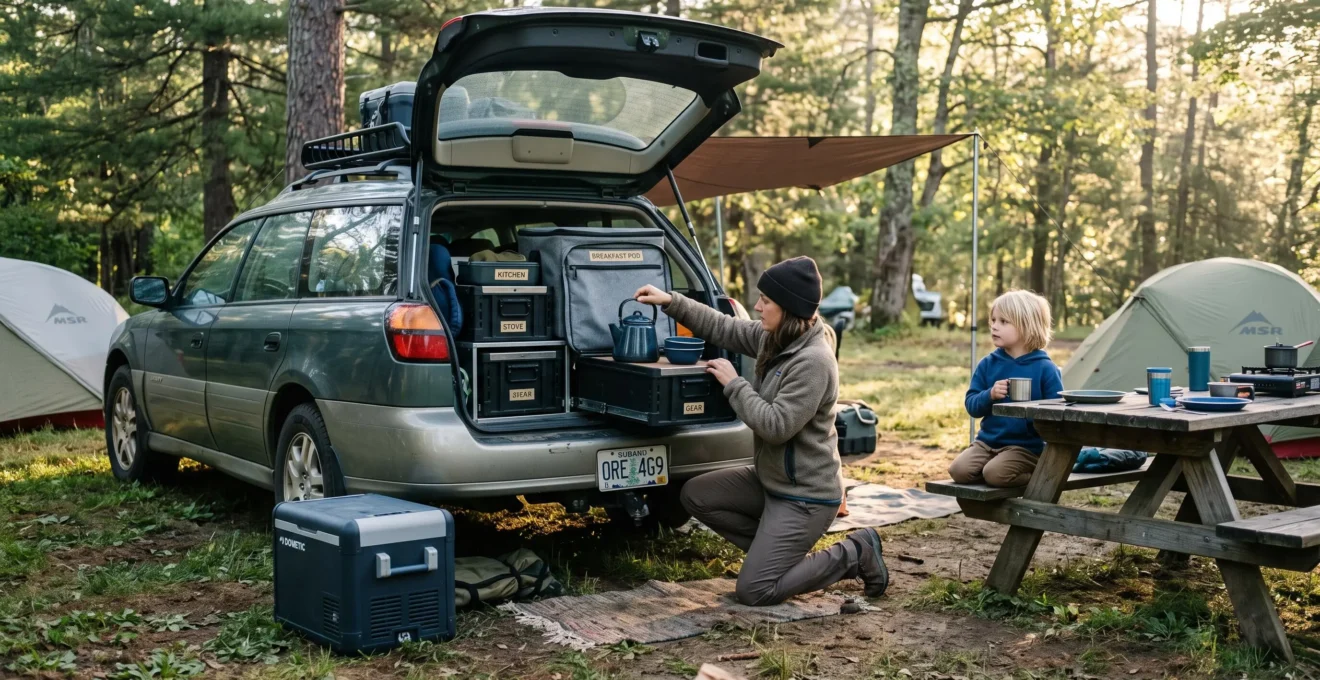
A frying pan buried beneath sleeping bags can turn a simple campsite lunch into an exhausting vehicle-unpacking exercise. The problem is rarely a lack of storage space. More often, cooking equipment has been arranged to fit the vehicle rather than to support the order in which meals are prepared.
Efficient camp kitchen packing starts with three decisions: which equipment must be reached first, where each item can be accessed, and how the load remains secure while driving. Frequently used cooking tools belong in reachable compartments, while reserve supplies can occupy deeper storage areas. Perishable food requires a separate temperature-controlled system.
For car campers and overlanders, the most practical arrangement usually combines dedicated cooking modules, flexible storage pouches and a consistent loading sequence. The arrangement should work at a roadside breakfast stop, during bad weather and after several days of changing food supplies.
The following methods turn vehicle storage into a repeatable kitchen workflow without sacrificing passenger safety, food hygiene or useful cargo capacity.
Camp kitchen packing essentials
- Pack cooking equipment according to how frequently and how soon it is needed, rather than grouping everything solely by size.
- Use accessible kitchen modules, secure heavy equipment low in the vehicle and prevent loose items from moving during transport.
- Keep perishable food at 40°F (4°C) or below, check cooler temperatures and plan meals around available refrigeration.
- How to Pack So Breakfast Equipment Is Always Reachable in 30 Seconds?
- The Stacking Error That Turns Every Meal Into a 10-Minute Unpacking Session?
- Modular Storage Boxes or Loose Packing: Which Keeps Camp Kitchens Organised?
- Should You Pack Your Camp Kitchen the Night Before or Morning Of Departure?
- How to Prevent Pots and Glass Jars Breaking During Off-Road Driving?
- How to Pack a Cool Box to Keep Food Fresh for Three Days Without Ice Refills?
- How to Build a Full Swag Camp Kit That Weighs Less Than 12 Kilograms?
- How to Pack and Store Perishable Meals in a Vehicle During Multi-Day Camping?
How to Pack So Breakfast Equipment Is Always Reachable in 30 Seconds?
Keep breakfast equipment in a dedicated, top-access container positioned beside the vehicle opening used for morning cooking. Pack the kettle, bowls, spoons, coffee and dry breakfast ingredients together. A 30-second retrieval target is achievable as a practical packing goal when the container is unobstructed, although actual access time depends on the vehicle layout and campsite conditions.
The simplest way to decide what belongs in this container is to reconstruct the first 30 minutes of a normal camping morning. Identify everything needed before the main kitchen is fully established. This might include a kettle, mugs, instant coffee, cereal, bowls, utensils and a lighter appropriate for the stove.
This creates a practical first-hour rule: equipment needed immediately after waking should not depend on unpacking equipment intended for later meals.
Accessibility also depends on where breakfast is prepared. A tailgate kitchen benefits from a container that opens directly from the rear cargo area. A separate table kitchen may work better with a removable breakfast box that can be carried in one trip.
Consider two distinct objectives: reaching the equipment without moving other luggage, and reaching it while remaining under shelter. During rain, a box accessible beneath an open tailgate or sheltered vestibule may be more useful than one requiring a walk around the vehicle.
A checklist attached inside the lid makes the system independent of whoever originally packed the vehicle. Label the container clearly and give each item a fixed position. This is consistent with REI‘s campsite setup and organization advice, which recommends dedicated equipment storage and established locations for frequently needed supplies.
Cold-weather mornings introduce a complication: milk, butter and other refrigerated breakfast ingredients cannot simply remain in the breakfast container overnight. Keep them in the cooler at a safe temperature, ideally together in an accessible section. The checklist can identify which refrigerated items need collecting.
A useful test is to pack the vehicle normally, close it, then ask another family member to retrieve everything required for breakfast. Time the process without offering directions. Any item that requires moving unrelated luggage reveals an accessibility problem.
Once breakfast equipment has a reliable location, the next challenge is ensuring the rest of the kitchen remains accessible throughout the day.
The Stacking Error That Turns Every Meal Into a 10-Minute Unpacking Session?
The most disruptive packing mistake is stacking frequently used cooking equipment beneath items needed less often. Vertical stacking may conserve cargo space, but it can force campers to remove several containers before reaching a stove or pan. Organising equipment by retrieval frequency and cooking sequence reduces unnecessary handling while keeping heavy loads properly restrained.
Imagine a vehicle packed with sleeping equipment on top, kitchen boxes underneath and reserve food at the bottom. Everything fits neatly during departure. At lunchtime, however, reaching a single frying pan requires dismantling much of the arrangement.
The problem can worsen during a multi-day trip. Food gets consumed, containers become partially empty and equipment returns to different positions. Unless gaps are controlled, boxes may shift during transport and the original packing sequence becomes harder to maintain.
A better approach follows the reverse-frequency principle: when loading equipment into an accessible storage area, position rarely needed items first and frequently used items last, provided this does not compromise load security.
For example, reserve pantry supplies can occupy deeper compartments, while the stove, cooking utensils and everyday cookware remain near the main opening. Dinner-only equipment may sit behind lunchtime essentials if lunch is typically prepared during short roadside stops.
To diagnose your arrangement, conduct a complete meal-access test at home:
- Pack the vehicle as it would be loaded for departure.
- Choose a representative meal without rearranging anything first.
- Start timing when you decide to prepare it.
- Stop when the necessary equipment is accessible and cooking can begin safely.
- Record which unrelated items had to be moved.
This is a personal diagnostic rather than a standardized performance test. Its purpose is to expose where the loading order conflicts with actual use.
Accessibility must never override vehicle safety. The National Transport Commission‘s light-vehicle load-restraint guidance recommends keeping heavy items low, distributing weight appropriately and controlling movement within the load. This Australian guidance is useful for planning, although applicable legal requirements vary by jurisdiction.
Heavy cookware should therefore remain low and securely restrained, even when frequently used. Drawers, stable low compartments or individually secured modules can provide access without placing heavy objects above passengers or lighter cargo.
Once the loading sequence works, choosing suitable containers can make that sequence easier to preserve between campsites.
Modular Storage Boxes or Loose Packing: Which Keeps Camp Kitchens Organised?
Modular storage boxes are generally easier to inventory and move between campsites, while loose packing can use irregular vehicle spaces more efficiently. Neither method is universally better. For many car-camping arrangements, a hybrid system works well: rigid containers hold the essential cooking equipment, and soft pouches accommodate smaller accessories and awkward spaces.
The best choice depends on how often the camp is moved, the vehicle’s cargo geometry and whether meals are prepared directly from the tailgate or at a separate cooking station.
| Criterion | Modular storage boxes | Loose or soft packing |
|---|---|---|
| Equipment organisation | Fixed locations and easier inventory checks | Requires consistent grouping to avoid misplaced items |
| Initial cost | May require additional containers or mounting hardware | Can reuse existing bags and storage spaces |
| Vehicle space efficiency | Rigid shapes may leave unused gaps | Soft items can fill irregular spaces |
| Repacking speed | Repeatable when contents remain consistent | Depends heavily on packing discipline |
| Frequent camp moves | Convenient for moving complete equipment groups | Flexible but may require more sorting |
A practical hybrid kitchen might contain a cookware module, a compact pantry box and a small pouch for cleaning supplies. Soft bags can fill spaces around the rigid containers without becoming essential supports for unsecured heavy loads.
One useful design criterion is meal completeness. A cooking module should ideally contain enough equipment to prepare a straightforward meal when combined with food from the cooler or pantry. If preparing lunch requires opening three unrelated containers, the modules may be organised by product category rather than by cooking workflow.
For example, a simple stove-and-cookware module could contain a pan, pot, cooking spoon and appropriate stove accessories. Fuel should be transported separately when required by its manufacturer’s instructions, and cooking appliances must be operated only in adequately ventilated, permitted locations.
Modularity introduces its own failure mode: containers gradually accumulate unrelated objects. A labelled pantry box becomes a storage place for spare batteries, tent pegs and miscellaneous tools.
Prevent this by assigning each module a short inventory and checking it during repacking. Labels such as « COOKING », « PANTRY » and « CLEANING » should describe the actual contents, not merely the original intention.
A storage system becomes genuinely efficient when it is easy to reset after every meal, not just when it looks organised before the first departure.
Should You Pack Your Camp Kitchen the Night Before or Morning Of Departure?
Pack dry cooking equipment and non-perishable supplies the evening before departure, but leave refrigerated food and temperature-sensitive items for the morning. This two-stage approach reduces last-minute packing pressure while avoiding unnecessary overnight exposure to unsuitable vehicle temperatures. Fuel containers and appliances also require storage and transport arrangements consistent with their safety instructions.
Night-before packing has a practical advantage beyond convenience: it acts as a rehearsal. Opening the cookware module may reveal a missing stove component, damaged utensil or empty cleaning bottle while there is still time to resolve the problem.
However, a fully packed vehicle is not automatically a suitable overnight storage environment. Interior temperatures can vary significantly with weather and parking conditions. Refrigerated food must remain under appropriate temperature control rather than being left in an unpowered cooler or parked vehicle.
The most reliable approach is a two-zone departure system:
- Evening zone: clean cookware, dry pantry items, plates, utensils, sealed cleaning supplies and secured non-perishable equipment.
- Morning zone: refrigerated food, frozen cooling packs, prepared drinks and any fuel items requiring last-minute loading under their storage instructions.
Keep the morning-only items together where they cannot be overlooked. A short list attached to the vehicle keys or kitchen module helps distinguish items already packed from those still waiting.
For an early ferry departure or a long driving day, complete as much dry-equipment packing as possible the evening before. The objective is to reduce morning decisions, not to compromise temperature control or fuel safety.
Five-point departure packing check
- Lay out the complete cooking kit and record any missing or damaged equipment on a written inspection list.
- Load and secure dry kitchen modules, then photograph the finished cargo arrangement for reference.
- Prepare a clearly labelled morning-only list covering refrigerated food, frozen packs and remaining approved transport items.
- Test access to the stove, breakfast kit and utensils, then record any items that require unnecessary unloading.
- Confirm the morning loading tasks are complete and check that the final cargo is restrained before departure.
This checklist produces an observable result: a secured vehicle, an accessible kitchen and a clearly identified set of tasks that cannot safely be completed the previous evening.
Once the equipment is loaded, protecting it from vibration and movement becomes the next priority, particularly on unsealed roads.
How to Prevent Pots and Glass Jars Breaking During Off-Road Driving?
Protect camp cookware by preventing movement inside and between containers, not simply by adding padding. Nest compatible pots with soft separators, fill unused gaps and secure storage modules against shifting. Replace unnecessary glass packaging where practical, and keep fragile or heavy items in low, restrained compartments rather than exposed roof or tailgate storage.
Off-road driving exposes equipment to repeated vibration, jolts and contact between neighbouring objects. Even when a jar survives a single bump, prolonged movement can loosen lids, damage packaging or cause hard surfaces to strike one another.
Padding reduces contact severity, but it does not solve the problem if objects have enough free space to move repeatedly. Gap control and load restraint are therefore as important as cushioning.
Nested cookware should have a cloth, silicone protector or suitable soft separator between contacting surfaces. Pot lids should be restrained so they cannot rattle freely. Small utensils can occupy protected spaces inside larger containers, provided sharp edges cannot damage other equipment.
Glass deserves a separate assessment. Before packing each jar or bottle, ask whether its contents can be carried in a suitable alternative container. Some dry ingredients can be transferred into reusable food-safe containers, while other products may be available in tins or flexible packaging.
Do not transfer food into an unsuitable container or remove original labels when identification, allergen information or storage instructions remain important.
Where glass is unavoidable, protect individual items from contacting each other. Store them upright where appropriate, contain possible leaks and place them in a secure low compartment. Central, low positioning may help avoid some exposed storage locations, but it does not guarantee breakage prevention.
After rough driving, use a short arrival inspection:
- Listen for unexpected rattling before opening containers.
- Check jars, lids and cookware for visible damage.
- Inspect food packaging for leaks or contamination.
- Separate any broken glass from food and handling areas.
- Collect fragments using suitable protection and dispose of them according to local waste rules.
If glass has contaminated food, discard the affected food rather than attempting to recover it.
Reducing breakable packaging also makes kitchen modules lighter and easier to rearrange, while the next major storage challenge is maintaining safe food temperatures.
How to Pack a Cool Box to Keep Food Fresh for Three Days Without Ice Refills?
To maximise cooler performance over three days, pre-chill the cooler and food, use sufficient frozen cooling material, keep the lid closed as much as possible and store the cooler in shade. However, three days of safe refrigeration cannot be guaranteed by a packing method alone. Perishable food must remain at 40°F (4°C) or below, verified with a thermometer.
Cooling performance depends on the insulation of the box, the starting temperature of its contents, ambient conditions, the quantity of frozen material and how often the lid is opened.
Pre-chilling matters because a warm cooler and warm food draw cooling capacity from the ice or frozen packs. Starting with cold contents reduces the amount of cooling needed immediately after loading.
A practical packing arrangement places frozen bottles or cooling blocks around the sides and lower sections, with regularly used food positioned where it can be retrieved quickly. This is an organisational method rather than a scientifically guaranteed temperature distribution. Air circulation, contact with cooling material and the particular cooler design can affect internal temperatures.
Frozen water bottles can reduce loose meltwater inside the cooler and may provide drinking water after thawing, provided the bottles and water are suitable for consumption. Leave adequate expansion space when freezing them. Their cooling performance should not be assumed identical to loose ice under every condition.
According to FoodSafety.gov‘s outdoor cooler safety recommendations, perishable food should be kept at or below 40°F (4°C), and a thermometer should be placed inside the cooler. The guidance also recommends sufficient cooling material, shade and limiting lid openings.
40°F (4°C)
Maximum recommended cooler temperature for refrigerated perishable food. The presence of ice alone does not confirm that food is being stored safely.
FoodSafety.gov outdoor food-safety guidance.
To evaluate whether your own cooler can support a three-day trip, conduct a home test under conditions representative of your planned journey. Pre-chill it, load the intended food and cooling material, and record thermometer readings at planned access times. Include realistic lid openings.
Record when the cooler can no longer maintain the required temperature. A successful test is useful planning evidence, but it is not a guarantee under hotter or otherwise different conditions.
If the cooler cannot maintain safe temperatures for the intended duration, plan reliable ice replenishment, shorten refrigerated meal storage or consider a suitably powered 12V refrigerator. A thermometer remains necessary regardless of the cooling system.
Once cooler capacity is understood, meal planning can reduce both refrigeration demands and the weight of equipment carried.
How to Build a Full Swag Camp Kit That Weighs Less Than 12 Kilograms?
A complete swag camping kit can only be confirmed below 12 kilograms by weighing every item included in the chosen kit definition. Count the swag, sleeping insulation, cooking equipment, food, water, clothing and essential safety supplies. Reduce duplicate cookware and heavy packaging first, while preserving adequate shelter, drinking water and emergency equipment.
The weight target becomes meaningful only when its boundaries are clear. A kit weighing less than 12 kilograms without water or food is not equivalent to a complete self-sufficient setup that includes both.
Start with a line-item inventory rather than relying exclusively on manufacturers’ specifications. Actual carried weight can differ because of accessories, packaging, additional fuel, repairs and personal equipment.
Kitchen weight often accumulates in items that appear individually reasonable: cast-iron pans, multiple pots, glass jars, full-size fuel containers and redundant plates or mugs.
For a compact cooking system, consider a single multipurpose pot, lightweight eating utensils and meals that require minimal cookware. Dry ingredients may reduce packaging bulk and carried food weight compared with some wet alternatives, although cooking water requirements still need to be accounted for.
The National Park Service‘s camping meal preparation advice supports simplifying cooking around one-pot meals and dry foods, while noting the importance of water weight and appropriate food storage.
A sensible reduction hierarchy protects essential functions before removing convenience items. Duplicate pans, excessive dinnerware and unnecessary accessories are candidates for elimination. Sleeping insulation, sufficient drinking water, first-aid supplies and equipment required for expected conditions should not be sacrificed merely to achieve an arbitrary number.
The following is an illustrative weight-budget allocation, not a verified equipment inventory:
| Category | Illustrative allowance |
|---|---|
| Swag and sleeping insulation | 5.0 kg |
| Cooking kit and fuel | 1.5 kg |
| Food | 1.5 kg |
| Water | 2.0 kg |
| Clothing and essential supplies | 2.0 kg |
| Total | 12.0 kg |
This example reaches, rather than falls below, 12 kilograms. It demonstrates how quickly the allowance is consumed and does not establish that any particular swag, water quantity or safety kit is adequate for a given trip. Actual requirements may make the target impractical.
Weigh every packed component using a suitable luggage or platform scale, including food, water and the bags or containers themselves. Record the measured total and repeat the check after final packing.
Weight optimisation is most useful when it supports an appropriate trip plan; the same principle applies to food storage, where convenience must remain secondary to safety.
Key takeaways before planning multi-day food storage
- Choose meals according to the refrigeration capacity actually available, not the cooler’s advertised or assumed endurance.
- Keep raw ingredients separated from ready-to-eat food and make high-risk items easy to inspect without repeatedly unpacking the cooler.
- Plan a safe alternative when refrigeration fails, rather than relying on food appearance or smell to judge safety.
How to Pack and Store Perishable Meals in a Vehicle During Multi-Day Camping?
Store perishable camping meals in a temperature-controlled cooler or refrigerator, never rely on an ordinary parked vehicle as refrigerated storage, and keep raw meat sealed below ready-to-eat food. Plan to consume the most refrigeration-dependent ingredients earlier in the trip. Check food temperatures regularly and discard perishables when safe storage conditions cannot be confirmed.
A parked vehicle is particularly challenging because sunlight can cause its interior temperature to rise well above outdoor conditions. Shaded parking, low cargo placement and insulation may help manage exposure, but none substitutes for verified refrigeration.
Food organisation should follow both risk and consumption order. Raw meat, dairy products and cooked leftovers require strict temperature management. Some whole, hardy produce may tolerate unrefrigerated storage, depending on the item and its condition, while cut produce generally requires refrigeration.
A practical multi-day menu uses highly perishable ingredients earlier and relies more heavily on shelf-stable foods later. This is consistent with National Park Service guidance to consume refrigeration-dependent foods earlier during camping trips. Early consumption reduces the duration of required storage but does not make unsafe temperatures acceptable.
Raw meat should be sealed in leakproof packaging and stored below ready-to-eat items so juices cannot drip onto other foods. Separate utensils and food-preparation surfaces should be used where needed to prevent cross-contamination.
Cooked leftovers require equally careful handling. FoodSafety.gov advises that perishable foods should generally not remain unrefrigerated for more than two hours, reduced to one hour when ambient temperatures exceed 90°F (32°C). These are cumulative food-safety considerations, not permission to store food at unsafe temperatures and then reset the clock by returning it to the cooler.
Discard food when its temperature history indicates unsafe storage. Smell, appearance and the amount of remaining ice cannot reliably establish whether food is safe to eat.
For an efficient daily routine, assign responsibility for cooler management and establish a simple operating protocol:
- Check the cooler thermometer before preparing refrigerated meals.
- Identify the ingredients needed before opening the lid.
- Remove the required items together and close the cooler promptly.
- Keep raw and ready-to-eat foods separated throughout preparation.
- Record temperature concerns and replenish cooling material or discard unsafe food as necessary.
Where camping regulations require wildlife-resistant food storage, follow the specific rules for the location. A vehicle or ordinary cooler is not automatically an acceptable wildlife-protection container in every campground.
For the next trip, pack one representative meal, test access to its equipment and ingredients, and verify the cooler’s temperature under realistic conditions. Adjust the kitchen layout based on what the test reveals before committing to a multi-day journey.
Where should a camping stove be stored in a packed vehicle?
Store the stove in a secure, accessible compartment where it cannot shift or be damaged during transport. Keep heavy equipment low and follow the stove and fuel manufacturers’ instructions for transport, storage and ventilation. Easy access should never compromise cargo restraint or fire safety.
How can a small car accommodate an organised camp kitchen?
Choose compact cookware, eliminate duplicate utensils and organise equipment into a small number of purpose-specific modules. Use soft pouches for irregular gaps, but secure every item properly. Position the equipment needed at short stops near the most convenient vehicle opening.
Should food and cookware share the same storage box?
Shelf-stable food can share a suitable clean storage module with protected cookware if hygiene, packaging and accessibility are maintained. Refrigerated perishables need their own temperature-controlled storage. Keep raw food isolated from utensils and ready-to-eat ingredients to avoid contamination.
How often should camp kitchen modules be reorganised?
Return equipment to its assigned location after each meal and inspect module contents before changing campsites. A more complete inventory check before departure can identify missing, damaged or unnecessary items. Reorganise the layout when repeated meal preparation reveals avoidable handling.
Can a cooler be left inside a vehicle during a hot camping day?
A cooler can only be relied upon for perishable food while it maintains a verified safe temperature of 40°F (4°C) or below. A hot vehicle increases the cooling challenge. Keep the cooler shaded where possible, monitor its thermometer and move it to a safer location or replenish cooling material when necessary.