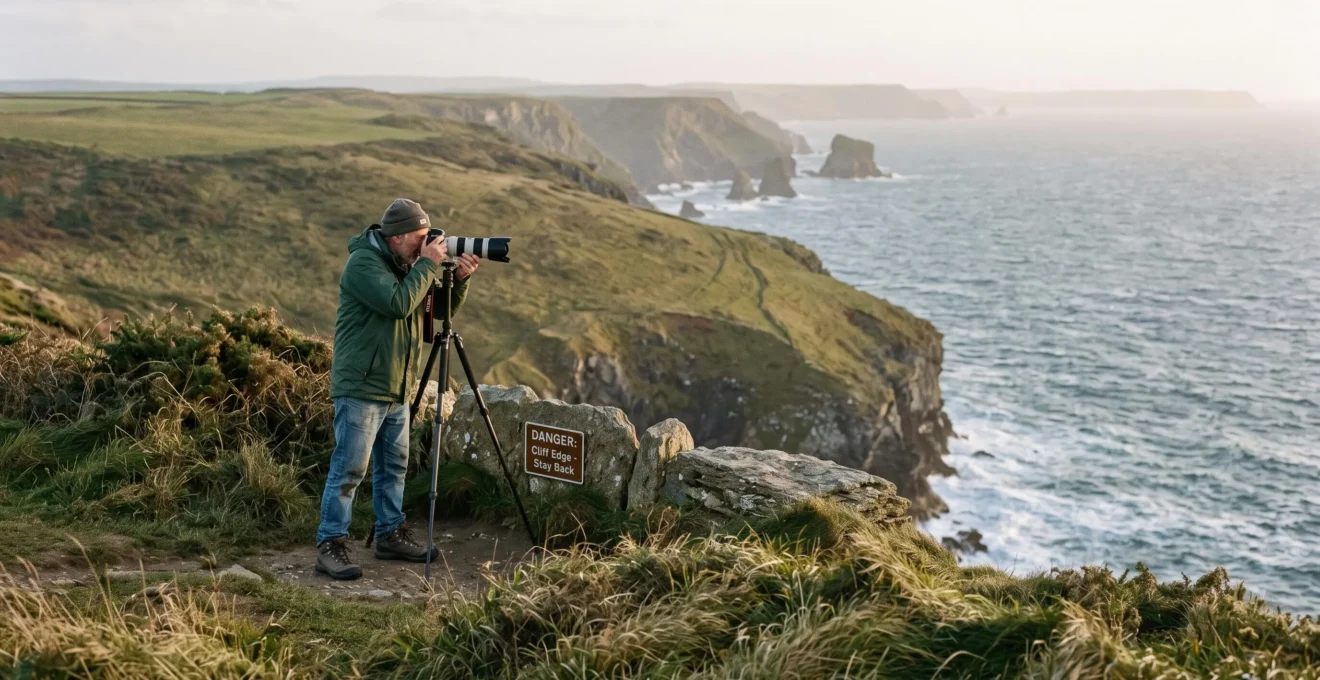
A dramatic clifftop photograph does not require standing beside a vertical drop. Many of the strongest coastal compositions come from established viewpoints, inland slopes and paths where the photographer can work without approaching potentially unstable ground. A longer focal length, carefully chosen foreground and controlled camera support can turn distance into a visual advantage.
The difficulty is that coastal cliffs rarely reveal their full structure from above. Grass can conceal cracks, waves can undermine rock beneath an apparently intact surface, and changing wind or light can distract attention from the surrounding terrain. A viewpoint that appears secure is not necessarily stable.
Safe clifftop photography begins with choosing where not to stand. The camera position must remain safely accessible throughout the session, including when adjusting equipment, reviewing photographs and packing up. Local warnings, geological conditions and return routes matter more than an attractive shooting angle.
Clifftop photography: essential safety principles
- Keep well away from cliff edges and obey marked restrictions. Hidden overhangs and fractures can make apparently solid ground unsafe.
- Choose focal lengths, viewpoints and camera supports that achieve the composition from established, stable ground.
- Check coastal forecasts and tides before visiting, and leave promptly if wind, visibility, ground conditions or access deteriorate.
- How to Recognise Dangerous Cliff Edges Before You Step Too Close?
- The Invisible Hazard That Causes 60% of Clifftop Falls on Calm Days?
- Zoom From Safety or Wide-Angle at the Edge: Which Creates Better Clifftop Photos?
- How to Position Camera Tripods Safely on Clifftop Terrain?
- When Should You Leave a Clifftop Location Even If the Light Is Perfect?
- How to Achieve Sharp Forest Photos Using Trees and Rocks as Stabilisers?
- The Coastal Campsite Parking Error That Doubles Salt Corrosion Exposure?
- How to Photograph Woodland Interiors Without Blur in Low-Light Conditions?
How to Recognise Dangerous Cliff Edges Before You Step Too Close?
Dangerous cliff edges may show parallel cracks, overhanging turf, loose rock or sections of ground that appear to be separating from the main cliff. However, the absence of visible damage does not establish stability. The safest approach is to remain well back, use designated viewing areas and never move forward merely to investigate suspicious ground.
Coastal erosion attacks cliffs from different directions. Waves can remove supporting material from below, while rainfall, weathering and geological weaknesses contribute to fractures higher up. From the clifftop, the resulting instability may be concealed beneath vegetation.
The South Downs National Park Authority‘s explanation of unstable chalk cliffs describes overhangs and cracks that visitors may not see while standing above them. Its advice is particularly relevant to the chalk coastline around the Seven Sisters and Eastbourne, although the underlying safety lesson extends to other eroding coastal landscapes.
Look for warning signs from an already safe, established position:
- Cracks parallel to the cliff face: possible separation between an outer section and the ground farther inland.
- Overhanging turf: vegetation extending beyond the soil or rock supporting it.
- Loose scree or recent debris: evidence of material moving or falling, although debris alone cannot establish when a collapse occurred.
- Uneven or slumped ground: possible movement within the cliff-top surface.
- Damaged paths or barriers: reasons to stop and use another viewpoint, rather than attempt to bypass the obstruction.
Different geological materials fail differently. Chalk can fracture and collapse suddenly. Sandstone and other sedimentary rocks may weaken along bedding planes or joints. Soft coastal deposits can slump when water alters their stability. Basalt may appear more resistant but can still contain fractured columns, joints and unstable blocks.
These variations make a universal setback distance unreliable. Even a seemingly generous distance cannot be certified safe without knowledge of the site. Follow locally established restrictions and keep farther inland wherever the terrain is uncertain.
A cautious observation routine begins before approaching the viewpoint: stop on a designated path, examine visible terrain without entering the suspected failure zone, check official notices and select a shooting position that requires no further movement toward the edge. A walking pole can help with ordinary footing on a safe path, but probing suspect ground cannot prove it will support a person.
Maps and fences also need interpretation. A mapped coastline may not capture recent erosion, and an old barrier may not reflect current conditions. Respect all restrictions, but never assume that the presence of a fence, track or mapped boundary automatically guarantees structural stability.
The practical rule is simple: if a composition requires approaching uncertain ground to judge whether it is safe, abandon that position. The next concern is what happens when the danger cannot be seen at all.
The Invisible Hazard That Causes 60% of Clifftop Falls on Calm Days?
Hidden undercuts and fractures are genuine clifftop hazards, but there is no substantiated evidence in the supplied research that they cause 60% of falls on calm days. The important danger is geological rather than statistical: a cliff can lose support below its visible surface, leaving an apparently continuous edge vulnerable to sudden failure.
Imagine a cross-section of a cliff. Waves repeatedly attack weaker material near its base, while the upper layers remain temporarily intact. As supporting rock disappears, an overhanging section may develop. Its grassy surface can resemble the surrounding land even though part of it extends above empty space or weakened material.
This process is not identical everywhere. The USGS scientific report on coastal cliff formation and stability examines processes including wave undercutting, rockfalls, landslides and progressive retreat. Geological structure, material properties and environmental conditions influence how and when failure occurs.
Calm weather complicates personal risk assessment. Without strong wind or obvious wave impact, a photographer may interpret the surroundings as harmless. Yet the visible weather does not reveal the cliff’s internal condition or the cumulative effects of earlier erosion.
Likewise, dry grass is not proof of secure ground. Some instability may be easier to notice after heavy rain, but other weaknesses remain concealed regardless of surface moisture. There is no reliable visual test that allows an untrained visitor to certify an apparently intact edge.
The widely framed 60% claim should therefore be treated as an unverified proposition, not an accident statistic. Neither the South Downs guidance nor the USGS publication establishes that percentage. It would also be misleading to conclude that calm seas undermine cliffs as rapidly as storm waves; erosion rates depend on local conditions.
After storms, heavy rain or unusually high tides, take additional precautions:
- Check the relevant coastguard, park authority or coastal management notices for recent failures and closures.
- Use designated inland viewpoints instead of recently eroded paths or informal lookouts.
- Allow more separation from visibly damaged terrain without treating any chosen distance as a guarantee.
- Avoid cliff bases as well as tops where rockfall or collapse warnings apply.
A useful personal exposure assessment asks whether the shot depends on ground that could be undermined, whether official access remains open and whether a safer established viewpoint exists. It does not attempt to assign an invented percentage probability of collapse.
Once a secure viewpoint has been selected, photography becomes a question of focal length and composition rather than physical proximity to the drop.
Zoom From Safety or Wide-Angle at the Edge: Which Creates Better Clifftop Photos?
Neither a telephoto lens nor a wide-angle lens automatically creates better clifftop photographs. A telephoto lens can isolate sea stacks, compress distant headlands and remove distracting foregrounds from a safe viewpoint. A wide-angle lens emphasises nearby terrain and spatial depth, but those effects do not justify approaching an unstable edge.
Longer focal lengths make distant objects fill more of the frame. From an inland vantage point, this can strengthen the visual relationship between layered cliffs, offshore rocks and distant coastal settlements. Changing camera position affects perspective; the lens determines how much of that perspective is included.
Wide-angle photography works differently. A nearby foreground can appear large against a distant coastline, creating a powerful sense of depth. Fortunately, that foreground does not have to be the cliff lip. An inland boulder, path curve, wildflower patch or naturally elevated viewpoint can provide depth without involving exposed ground.
Nikon‘s waterfront photography techniques illustrate different uses for telephoto and wide-angle lenses, fast shutter speeds and stable camera supports. These are photographic techniques, not evidence that any particular clifftop position is safe.
The following comparison starts with the intended photograph rather than a supposedly necessary edge position.
| Desired photograph | Safer position and technique | Trade-off |
|---|---|---|
| Layered headlands | Established inland viewpoint with a telephoto lens | Haze may reduce distant detail |
| Sea stack close-up | Marked lookout with an appropriate long focal length | Narrower field of view |
| Dramatic landscape depth | Wide-angle lens with a safe inland foreground | Less emphasis on the immediate drop |
| Cliff curvature and coastline | Elevated designated viewpoint looking along the coast | Composition depends on accessible terrain |
| Overhead coastal pattern | Approved elevated observation point or lawful drone photography from a safe operating location | Access, airspace, wildlife and operating restrictions may limit options |
A longer lens has disadvantages. Atmospheric haze, sea spray and temperature-related air distortion can reduce distant image clarity. Shooting during clearer conditions, particularly when atmospheric turbulence is less pronounced, may improve results. Early or late light can also produce attractive shadows and silhouettes, although it does not guarantee clearer air.
Drone-style overhead compositions offer another possibility, but an actual drone is not always permitted or appropriate. Local aviation rules, protected wildlife, wind conditions and safe launch locations must be considered. Similar graphic patterns may sometimes be obtained with a telephoto lens from higher inland terrain.
Creative pressure is a separate hazard. Photographers may convince themselves that a picture requires another step forward because a particular foreground or angle looks irresistible. A preplanned shot list prevents that decision from being made impulsively.
Before arriving, identify the essential elements of each frame, suitable focal lengths and designated viewpoints. If a planned composition proves impossible without entering hazardous ground, substitute another shot rather than negotiating with the edge.
With the framing selected, the next challenge is supporting the camera against wind and uneven terrain without allowing equipment placement to dictate a dangerous body position.
How to Position Camera Tripods Safely on Clifftop Terrain?
Position a tripod on confirmed, accessible ground well inland from the cliff edge, with enough space to stand, operate the camera and retrieve equipment without leaning toward a drop. Keep its legs short where practical, distribute the load securely and avoid questionable soil, cracks and exposed terrain. No camera stabilisation benefit justifies placing equipment in a hazardous zone.
A tripod changes how a photographer moves. Once the camera is mounted, attention shifts toward the viewfinder, exposure settings and precise framing. Repeated small adjustments may draw the operator forward if the tripod was positioned too close to a boundary.
Select the standing position first, then the tripod position. Both must remain comfortably accessible throughout the session. A substantial rock outcrop can help provide shelter or define an inland working area, but its presence does not certify that the surrounding ground is stable.
For uneven but demonstrably stable terrain, adjust tripod legs individually and spread them appropriately to create a balanced platform. Shorter leg extension generally reduces leverage from wind. Check all leg locks, the tripod head and the centre column before attaching a heavy camera.
Do not test suspect cliff material by kneeling, pressing down with your hands or deliberately loading a weakened surface. These actions still expose the body to a potential ground failure. If the support area looks fissured or unstable, relocate to a designated viewpoint.
Wind introduces another problem. A sudden gust may rotate the camera, shake the support or overturn a poorly balanced setup. A weight bag can lower the centre of gravity when correctly secured, but a swinging load can also destabilise a tripod. Keep added weight low, controlled and within the manufacturer’s stated capacity.
Avoid fastening equipment to loose fence posts, corroded fixtures or structures of uncertain strength. Safety barriers should not be used as improvised tripod supports unless their intended use explicitly permits it.
Whenever gusts become difficult to manage, lower or pack away the equipment. Never leave a mounted camera unattended where a fall could endanger someone or encourage a hazardous retrieval attempt.
Five checks before a clifftop tripod session
- Confirm the viewpoint: identify an officially accessible shooting area and record it on the route plan.
- Choose the standing zone: mark a stable inland operating position with clear space for the photographer and tripod.
- Inspect the equipment: verify that tripod locks, head attachment and leg adjustments are secure; complete a physical equipment check.
- Assess wind exposure: confirm that the support remains controllable under current conditions and identify a sheltered alternative.
- Plan the exit: identify the route back and a condition that will trigger packing up; confirm both before the first exposure.
Even a secure initial arrangement can become unsuitable when weather, access or visibility changes. Knowing when to stop is therefore as important as setting up correctly.
When Should You Leave a Clifftop Location Even If the Light Is Perfect?
Leave a clifftop location when wind becomes difficult to manage, ground movement or new damage appears, visibility deteriorates, daylight becomes insufficient for a safe return or the planned exit route may be compromised by the tide. Any credible safety trigger outweighs the value of the photograph, even during exceptional golden-hour light.
Photographers often invest time in reaching a viewpoint and waiting for ideal conditions. That investment can make departure feel like surrendering an opportunity. In reality, staying longer does not make unstable terrain safer or restore a diminishing return margin.
A departure decision should be established before the session. Pack up and leave if any of the following occurs:
- Wind strengthens enough to affect balance, equipment control or safe movement.
- New cracks, slumping, falling material or unusual ground movement are observed.
- Sea conditions change in ways that threaten a beach, cove or coastal access route.
- Rain, fog or fading daylight makes the return path difficult to follow.
- A companion becomes tired, distressed, distracted or unable to continue safely.
- Official instructions require visitors to leave or a previously accessible area is closed.
Ground tremors, cracking sounds or visible movement near a cliff are reasons to retreat, not opportunities to investigate or document a collapse at close range. Move inland by an established safe route, avoid exposed areas and follow emergency guidance where necessary.
Tides deserve particular attention because a route may look accessible from above while rising water closes a lower passage. The Met Office explanation of beach forecasts and tide times describes changing tidal heights and the danger of beaches or coves becoming cut off.
Consult local tide times, tidal heights, coastal forecasts and any route-specific warnings before leaving. A general weather application may not provide sufficient information about coastal access. Never assume that the route used on arrival will remain available throughout the visit.
Group photography requires a conservative departure policy. Children and inexperienced companions may become tired or distracted sooner than the person concentrating on the camera. The session should end when its least comfortable participant needs to leave, not when the lead photographer has exhausted every composition.
Arriving early reduces the temptation to overstay. Scouting in daylight, identifying return landmarks and choosing compositions in advance make it easier to stop while conditions are still manageable.
When wind or fading light makes tripod use impractical, safer alternatives may involve sheltered inland locations and handheld stabilisation techniques rather than extending the session beside a cliff.
How to Achieve Sharp Forest Photos Using Trees and Rocks as Stabilisers?
Sharp photographs can be made without a tripod by supporting the camera against a stable tree, resting the elbows on secure rock or using a balanced stance to reduce hand movement. These techniques transfer from woodland to exposed coastal viewpoints, provided that the support itself is stable, safely accessible and well away from cliff hazards.
In a forest, low light is often the main obstacle. On an open coast, wind may become more important, especially with longer lenses. The stabilisation principle remains the same: reduce unintended camera movement without introducing a new physical risk.
Several natural supports can be useful, but their reliability cannot be ranked solely by appearance. Competent bedrock on a stable inland surface may offer firm support, while a detached boulder could move. A substantial rooted tree may be dependable in ordinary woodland, whereas a tree undermined by coastal erosion may not be.
A wooden fence post is particularly uncertain. Salt exposure, weathering and loose foundations can weaken fixtures that still appear solid. Fences may also be positioned near hazards or serve as safety barriers, making them unsuitable for improvised camera bracing.
Use the following techniques only from secure ground:
- Tree support: stand against a substantial, stable trunk to reduce upper-body sway without damaging the tree.
- Rock support: rest an elbow or padded camera support on secure inland rock, keeping the lens and camera strap away from rough surfaces.
- Balanced stance: place feet comfortably apart, keep elbows near the torso and avoid leaning beyond a stable standing position.
- Controlled breathing: exhale gently, pause comfortably and release the shutter without abruptly moving the camera.
- Strap tension: where appropriate, use a securely attached camera strap to reduce movement without creating a snagging or balance hazard.
Short bursts can increase the chance of obtaining a sharp frame when minor vibration varies between exposures. However, burst shooting does not correct an inadequate shutter speed for a consistently moving subject.
Distinguishing the source of blur is essential. If the entire scene is smeared in the same direction, camera movement is a likely cause. If stationary rocks remain sharp while grass or clothing is blurred, subject movement is more likely. A sturdy brace addresses the former; a faster shutter speed may be needed for the latter.
Image stabilisation systems can help with camera shake, but their effectiveness depends on equipment and shooting conditions. They cannot prevent wind-driven vegetation from moving during an exposure.
These techniques are especially valuable during coastal walks that begin at a campsite, where the protection of both the photographer’s equipment and the transport vehicle also deserves attention.
The Coastal Campsite Parking Error That Doubles Salt Corrosion Exposure?
Parking directly in exposed onshore winds can increase the amount of salt-laden moisture reaching a vehicle and its photographic equipment. However, there is no verified evidence in the supplied sources that one parking mistake doubles corrosion exposure. The practical choice is to favour designated, sheltered parking away from direct sea-spray exposure whenever conditions and campsite rules allow.
Marine air contains salt aerosols transported inland by wind. Their concentration and deposition vary with proximity to breaking waves, wind direction, shelter, local terrain and weather. Moisture can contribute to corrosion when salt remains on exposed metal surfaces.
A clifftop campsite with an unobstructed seaward parking area may expose vehicles differently from a sheltered inland pitch. Nevertheless, there is no defensible universal multiplier for that difference, and turning the vehicle to face another direction does not eliminate airborne salt.
When choosing between permitted parking spaces, consider three practical factors:
- Wind exposure: a sheltered inland-side pitch may reduce direct exposure to salt-carrying onshore winds.
- Natural barriers: suitable vegetation, buildings or landforms may interrupt airflow, although their effectiveness depends on local conditions.
- Forecast conditions: stronger onshore winds, sea spray and overnight moisture can justify moving equipment into more protected storage.
Do not park near cliff edges, unstable ground or restricted coastal areas to obtain shelter or a better vehicle photograph. Campsite access rules and safe parking surfaces take priority over corrosion considerations.
Photographic equipment stored in a vehicle experiences part of the same environment. Tripod joints, metal fasteners, camera controls and exposed connectors can accumulate contamination. An open roof box or poorly sealed equipment bag may also allow moisture and salt deposits to reach sensitive items.
Use clean, dry protective storage and follow the equipment manufacturer’s guidance. Desiccant packs can help manage moisture in appropriately closed containers, but they do not remove existing salt deposits. Avoid trapping damp or contaminated equipment in sealed bags for extended periods.
After a coastal stay, inspect accessible exposed metal, hinges and equipment contacts for residue or corrosion. Where the vehicle manufacturer permits it, freshwater rinsing of appropriate exterior areas may help remove surface salt. Do not indiscriminately rinse cameras, electrical connectors, brake assemblies or other sensitive components.
Cleaning methods must match the equipment. Optics generally require suitable lens-cleaning procedures, while cameras and tripods may have specific instructions concerning water resistance, lubricants and surface finishes.
The doubled-exposure claim remains unverified because the supplied research contains no comparative vehicle-deposition measurements. It should not be presented as a quantified parking rule.
Once gear is protected and the route planned, attention can return to image quality. The low-light techniques developed in woodland photography offer useful solutions for coastal dawn and dusk without requiring closer access to a cliff.
Key takeaways before shooting in difficult light
- Decide whether camera shake, moving subjects or insufficient depth of field is the main technical limitation before changing exposure settings.
- Use established, stable inland viewpoints and available safe supports; never relocate toward a cliff edge merely to avoid raising ISO.
- Prepare exposure and framing decisions before the best light arrives so fading visibility does not force hurried, repeated attempts.
How to Photograph Woodland Interiors Without Blur in Low-Light Conditions?
To photograph woodland interiors sharply in low light, choose a shutter speed appropriate to the focal length and subject movement, stabilise the camera where possible and adjust aperture and ISO to maintain usable exposure. The same method works for coastal dawn and dusk photography, where wind, limited light and high scene contrast can make technically successful photographs more difficult.
Woodland scenes and coastal landscapes share an exposure problem: limited light may coincide with deep shadows and bright highlights. A forest canopy produces patches of sunlight against dark undergrowth, while a bright coastal sky may sit above a much darker headland.
Exposure decisions involve three linked controls:
- Shutter speed: controls exposure duration and the amount of movement recorded.
- Aperture: changes light transmission and depth of field.
- ISO: changes the camera’s effective exposure sensitivity setting, with higher values generally making noise more apparent depending on the camera and processing.
For static woodland details, a slower shutter speed may be acceptable if the camera is adequately supported and the subject remains still. Wind-driven coastal grass, moving foliage or sea spray may require a faster exposure even when the camera itself is motionless.
The handholding decision should begin with focal length and actual movement. Longer focal lengths magnify the appearance of camera shake, making support or faster shutter speeds more important. Stabilisation technology changes what is possible, but testing results on the camera is more reliable than assuming a universal handholding limit.
A practical example is a shaded woodland scene containing stationary rocks and swaying leaves. With a supported camera, the rocks may remain sharp during a relatively slow exposure while the leaves blur. Increasing shutter speed can freeze more of the moving foliage, but may require a wider aperture or higher ISO to compensate.
The equivalent coastal scene might contain stationary distant cliffs and foreground grass moving in strong wind. If the photographer wants both sharp, a faster shutter speed may be more important than maximising depth of field. If intentional motion blur is the goal, a slower exposure may be appropriate from a safe, stable support.
High-contrast scenes also need careful metering. Exposing entirely for dark foregrounds can wash out bright cloud detail. Highlight-aware exposure settings, histogram review and suitable RAW processing can help retain usable image information.
Exposure bracketing offers another option for stationary scenes. Capture several exposures without moving the camera so that shadow and highlight information can potentially be combined later. This works best where movement between frames is limited; wind-driven leaves or waves may introduce alignment problems.
Bracketing does not guarantee that a photographer will finish more quickly. Its advantage is a planned method for difficult tonal conditions, reducing the temptation to change position repeatedly in search of a single perfect exposure.
Most importantly, image noise is a lesser concern than physical safety. If a secure viewpoint requires a higher ISO than originally intended, accept the technical compromise. If conditions prevent a workable exposure from that position, change the photographic objective or end the session.
Before the next coastal shoot, select an established viewpoint, check local cliff and tide guidance, prepare a composition that works from inland and set a firm departure condition. A slightly noisier image captured from secure ground is preferable to a technically perfect photograph that depends on an unstable edge.
Is there a minimum safe distance from every cliff edge?
No universal distance guarantees safety. Coastal geology, erosion, fractures, weather and local access conditions vary. Follow official closures and designated viewing areas, remain well back from exposed edges and seek an alternative viewpoint whenever stability is uncertain.
Can a grassy cliff edge collapse without visible warning?
Yes. Overhangs, concealed fractures and erosion beneath the surface may be difficult or impossible to recognise from above. Intact vegetation and dry ground should never be treated as proof that an edge can support additional weight.
What should a photographer do if a camera falls toward a cliff edge?
Do not chase, reach for or attempt to retrieve equipment from unstable ground or beyond a safety barrier. Remain in a safe location. If equipment creates a hazard for other visitors, inform the appropriate site authority rather than attempting a dangerous recovery.
Are clifftops safe for photography when there is no wind?
Calm weather does not establish geological stability. Previous wave erosion, rainfall, fractures or gradual cliff retreat may have weakened the terrain independently of current wind conditions. Always assess access restrictions and choose established viewpoints.
Can a smartphone capture dramatic coastal scenery without standing near the edge?
Yes. A smartphone can produce strong coastal images from established viewpoints by using available optical zoom, thoughtful framing, inland foregrounds and suitable lighting. Digital zoom may reduce fine detail, but moving closer to an unsafe edge is never an appropriate solution to that limitation.